 Story, Camera, Shots! How to Use Cinematic Techniques to Add Life to Your eLearning">
Your e-Learning course must have a narrative that flows.
Like a cinematic masterpiece, your selection of graphics, text, audio, and video all need to work together — complementing one another so that your learners remain glued to the screen. A great way of developing a narrative that flows is by using various cinematic techniques.
Hence, this post will highlight some film techniques that will give a touch of Hollywood to any eLearning course, and which (of course) every eLearning designer must have in their toolbox. But before we can start calling/taking some shots, there is some storytelling to be done.
Storytelling — the Prerequisite to Taking Shots
The most important thing in cinematic is the shot. It is the smallest unit of any visual storytelling. For eLearning courses, you can think of every visual instance that your audience will experience at every click/tap (think slide) is a shot.
However, like a movie, unless these individual shots seamlessly flow from one to the other, the audience will lose focus. And the only way to create this flow is by first having a script for the entire “movie”. For example, you can create a “day in the life” story; this is a commonly used narrative technique that can make your eLearning course flow naturally.
But, you must first know what you want the audience to experience from it.
Therefore, you must first create a clear storyboard for the content that you want to convey. Brainstorm ideas and storyline for the course content.
Think of the characters that you want to add:
- Their posture
- Their expressions
- Their attire
- Their gestures, and
- Their roles
By involving multiple stakeholders, it becomes easier to involve them as characters for the story.
Cinematic Techniques for eLearning
Technique #1: Use Camera Angles
One powerful way to communicate with your learners is through camera angles. A camera angle is the position of the camera when a shot is taken. Different angles can add and induce different meanings and level of engagement for the audience. Selecting the appropriate camera angle for each shot can add moods to the recorded picture and create powerful relationships with your audience.
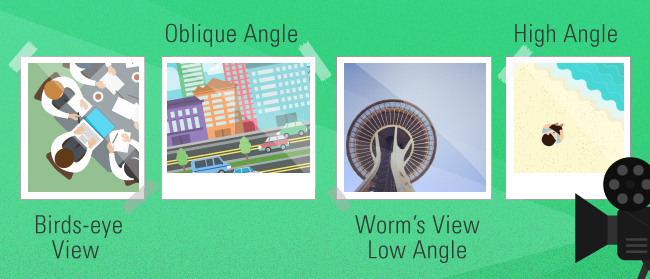
Primary (non-boring) camera angles include:
- Birds-Eye View — From above the subject, best used for isolating the subject to a dramatic effect.
- Oblique Angle — shot taken at a tilt. Adds a level of disorientation and engages.
- Worm’s View (aka Low Angle) — Shot from below the subject, looking up on a scene. Make the subject look larger than life, signifying power and tension in the scene
- High Angle — Shot from a height, making the subject seems smaller, signifying insignificance and week relationship with the environment.
Technique #2: Use the Right Shots
The distance between the camera and the subject define relationship (and importance) between the subject and the scene.
Focus on using the right shots in your courses to communicate meaning:
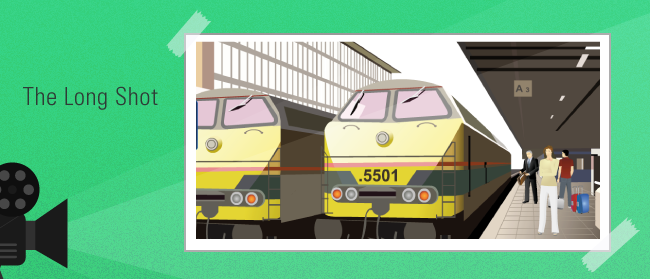
1) Add Context with a Long Shot or Extreme Long Shot
This type of shot shows a scene as seen from a distance. It is used to stress the environment in which the subject is.
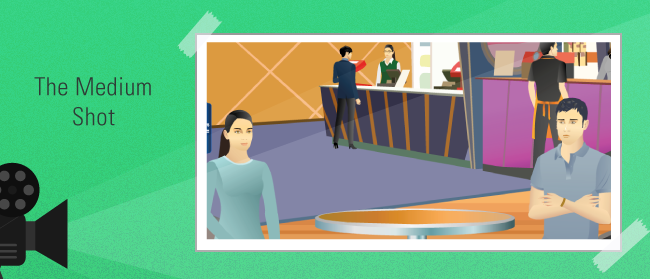
2) Take a Medium Shot to highlight interaction
A general purpose shot, it is taken above-the-waist height. It is more intimate than a long shot, and a great way of focusing on interaction between multiple subjects in the scene (and hence minimal focus on the background) e.g. a debate, a struggle, etc.
It is best used to allow the audience to pick on the body language of the subject (gestures, expressions, movements, etc.). It is often used in sync with a close-up shot.
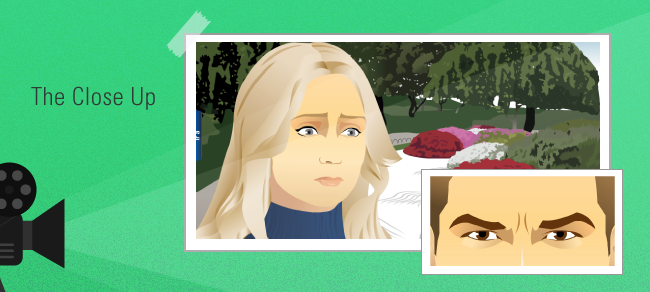
3) Use Close-Up for details and expressions
This type of shot focuses on the upper part of the object/subject, offering a targeted view of a single area/region or aspect of the image and hence adding emphasis to the scene. Examples include facial expressions of the subject and the details of part of an object. Including strong and vivid details will make your story come alive for the learner. Detailed shots help learners connect to the story and give the story credibility.
Technique #3: Flashforward
Flashforward is a cinematographic and literary technique of altering time’s logical sequence "past-present-future,” beginning with the events in the future and then jumping in time to deal with present events. Therefore, the order of events which traditionally is 1-2-3 can become a 1-3-2 or 3-1-2 argument. In other words, it "introduces the end in the beginning" (Cole, 2003).
When using Flashforward technique, we force the audience to evaluate the material corresponding to the future, in light of new information. This way we create curiosity in the learner and we encourage them to analyze and reflect on the chain of events that led to a problem, something that is certainly very educational.
Ready to transform your corporate training?
See real results from companies that train with SHIFT — or talk to our team.